Easy Food Container Labels Using Vinyl (plus get a FREE svg file to make your own!)
- Katie Zurawski
- Aug 29, 2017
- 5 min read

Want to make your pantry look more pretty than is really necessary? If so, I have the perfect project for you today! These food container labels are pretty, simple and functional, too.

I have had this project on my “to-do” list for months. I saw some cute ones for sale on Etsy and knew I do something similar for a fraction of the cost. Plus I love labeling containers. I think it makes things easier to find while also looking pretty.
I LOVE, LOVE OXO Pop Containers. I have them in big sizes and small sizes, square and rectangle, tall and short. They come apart to clean and last forever. I have had these for well over three years and they still do a great job of keeping food like cereal from going stale. I have never strayed from this particular brand and typically buy them from Kohl’s when they go on sale. I would highly recommend them (buy them here). You can also find them at JC Penney, Bed Bath & Beyond and other popular stores.

Before staring this project, I had boring clear labels on these OXO Pop Containers that I created with my label maker. While they were functional, they weren’t necessarily pretty. I wanted to give them a facelift. Here is how I completed these labels:
Supplies Needed:
OXO Pop Containers
Cricut cutting machine
Sure Cuts a Lot software (I have version 2 but any version would work) OR similar software for cutting with your machine
Vinyl
Transfer Tape
X-Acto knife
Step 1: Clean OXO containers
You first want to clean your containers well. Make sure the area where you are placing the vinyl is cleaned off well too. Also remove any labels you already have attached and residual glue or adhesive from them.
Step 2: Select vinyl & adhere to Cricut mat
Choose vinyl color and cut down the vinyl to your Cricut mat size. Although the examples I saw on Pinterest used white vinyl, I had this beautiful green I had from a Pick Your Plum purchase (love their stuff!). This type of vinyl had a little more sheen to it than most others I work with. I like the extra shine. When you have your vinyl cut down (mine was roughly 12×12), place it on your Cricut mat.

Step 3: Measure containers
You’ll want to have a good idea of what you want to put on the containers. You also want to decide which direction the lettering will go as well as how much buffer you want around them. Take measurements using a ruler so you have a good idea of how long and tall each label should be.
I made labels for the following containers:
Sugar
Flour
Brown Sugar
Powdered Sugar
Cereal (x2)
Chips (x2)
Coffee
My brown sugar and powdered sugar containers were smaller than the others so I took that into consideration. Also my chips and cereal container were long and tall so I decided to put those label going sideways.
Step 4: Load SVG file into cutting software & adjust size
Next you want to load my free SVG file into your cutting software. I created my own based on the particular sizes I needed. Typically the hardest part of any of my vinyl projects is choosing the font. Luckily I found the perfect one right away and just went with it. It is called Angie Makes ClapHands. It is part of a font bundle called Fabulous Fonts. It costs $25 but has 21 amazing fonts I use ALL.THE.TIME. Definitely worth the cost. You can purchase it here. If you want to use another type, simply find a different font you like and adjust the SVG file accordingly.
Here are some tips for picking the right fonts for cutting with vinyl:
Fonts should be as solid as possible
Choose thicker fonts or ones you can make bold (thin ones are harder to work with)
Make sure to preview the cut lines before you go with a font to see how it will actually cut
You can create a more cursive-like look (combined letters) using the weld function
Once you have my file loaded, you will want to adjust the size. For me, I combined all the separate words (by dragging a box around them) and then adjusting the size as a whole. Make sure to choose “Keep Proportions” than resize to 10.632″ wide by 6.172″ tall.

Step 5: Cut vinyl & weed your labels
Next is the fun part… seeing your labels come to life! I set my Cricut’s speed to “3” and the pressure to “4”. It went through the paper backing in some parts but that’s OK with me. Next you need to weed out the excess pieces in between. Start by taking out the outer pieces of vinyl. Then use an X-Acto knife to carefully remove the inner parts of letters like the middle of an “o” or “a”.
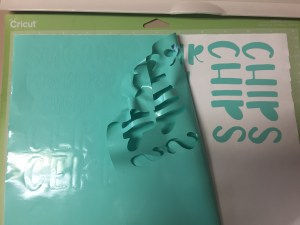

Step 6: Place on transfer tape
Now’s the time to layer transfer tape over the top of your vinyl letters. I typically will cut the labels apart and then place a piece of tape over each. You can also reuse the tape placing it on one label, applying it to the container, and then placing it on another and repeating. It is up to you. To get the best placement, keep the vinyl backing (the paper behind the vinyl) and your tape just slightly larger than the label itself. This will help you get an accurate idea of how it will fit on the container. Use your fingers (or a wooden spoon) to press the tape down onto the vinyl.
Once the tape is on top, you want to remove the paper backing from the vinyl. Take your tape and work from one end to the other gently lifting it from the paper. At this point you want the vinyl to stick to your tape. The vinyl will be sticky on the side exposed (that’s how it sticks to the container). Lay your vinyl with tape upside down on a table or you will end up getting your labels stuck to the surface.

Step 7: Apply vinyl labels to your OXO Pop Containers
Finally the step you’ve been waiting for…. applying your beautiful labels to the containers. I started by lining up same size containers together. When I placed the vinyl on, I wanted them to be in the about the same place on each. Since they were nesting right next to each other in my pantry, I didn’t want one lower or taller than the other. Next I took my first label and applied it to the first container. You gently rub all the areas and then peel away the tape from one side to the other. Press out any bubbles. Vinyl is fairly forgiving….. if I need to re-position a letter, I can usually lift it with my X-Acto knife and move it.

Step 8: Enjoy your gorgeous new pantry
Maybe I am an organizing junky, but I LOVE opening up my pantry and seeing these stylish containers. There were worth all the time it took to create them (which was less than an hour!). I would recommend ONLY hand washing your containers and not placing them in the dishwasher. After working with vinyl for years, I fully expect these labels to last for a long time. They hold up well to my kiddo’s grimy hands and constant usage. And you are completely safe spot-washing them as needed. I just wouldn’t fully emerge them in water too frequently.
The End Result:


Don’t have a Cricut but still want fancy labels?
If you don’t have a Cricut but still want fancy food container labels, there are many options:
Scrapbook letters from a craft store
Purchase a vinyl set online
Use a label maker to create your own
Print on clear labels using your computer
Download this FREE SVG file to create your own labels!
This svg file is all set to use with your software — adjust the sizes and fonts as needed. Feel free to contact me with any questions!
Save


Comments